Wednesday, March 27, 2013

Designer Inspired Frames

I adore Emily Henderson.  I love her comfy, liveable take on midcentury-modern-meets-LA-beachy decorating style.  While it worked quite well for me when I lived in sunny Florida, it is hard to incorporate that into the chilly wilderness of Pennsylvania--especially when there is a foot of snow on the ground!

That said, I just can't give up on the little treasures that Em has in store for me in the pages of HGTV magazine.  Okay, I totally talk about the divine Ms. H like we have brunch every Sunday at some airy cafe in La-La land.  I think she just has that approachable, friend-sort of quality... so I'm running with it.

In my current HGTV issue, Em did a whole house redec for a lovely couple and their little boy.  I love the chalkboard wall, but that would never work on the 145-year-old plaster walls that I have.  I also adore the roughed-up turquoise dresser which lends itself to the vintage+beachy thing that Emily does so well.  But, the things that I love the most from this photo are the frames!  Boring old white frames given a little bit of glitz and a whole lot of interest.  I love how it doesn't overshadow the artwork, or compete with it... it just highlights it while doing a spanking good job at being pretty.

And I like pretty.


If you're wondering which "current issue" I'm referring to, since I tend to get my subscriptions later than everyone else, it is the April 2013 issue and the front cover looks like this:


If you've been paying attention to the bedroom redecorating, you have seen these:

If you're wondering what the bottom print says, here's a more legible version:


The little boy says, "Hi Bear!"
The big bear says, "Hello."
The baby bear says, "Papa, I want to eat that little boy."

Okay, I like a little twist in addition to pretty.

So, one might think that you can just whip together these frames with some acrylic craft paint and some painters tape.  You can!  Well, almost.  I ran into some issues with this project, which is why I'm sharing it.  So, let's move on to the labor-intensive (ha!) part of this whole shebang.

I used the 2 oz tubes of craft paint found at nearly every big box store nationwide.  I used the Patio Paint version for the white, because I thought it would stand up to casual bumps and dings better than the regular.  I don't know where I got that idea, but I went with it.  You'll also need painters tape.  Width doesn't matter, but you want the sort for delicate surfaces since you do not want to pull your freshly-painted white base coat off of the frame.  I used FrogTape brand tape for delicate surfaces (it is yellow).  A butter knife or a ruler with a thin metal edge also comes in handy for when the tape is removed.  I used a 1/2 inch all purpose acrylic paintbrush (the sort you would use for a painting, not a wall).  Lastly, a sheet of fine grit sandpaper is needed if your frames are coated with any sort of laminate.

The first frame I painted is the one with the bear print.  It went off without a hitch and I completely forgot to take photos of the process.  The wood on the frame was not stained, and as far as wood goes, it was unfinished and a bit rough to the touch.  In other words, it was in perfect pre-paint condition.  That frame sucked up the paint like no one's business.

If you are using an unfinished wood frame, simply apply the tape to the frame (straight across, or adjacent edges... whatever floats your boat).  If your frames are laminated or have a shiny coating of any sort, you're going to need to do some extra work.
I tried to tackle the Ikea Ribba frames as they were.  The surface was smooth, but didn't feel lacquered at all.  I'm pretty sure the designers at Ikea developed some sort of anti-paint coating for these, because I wanted to toss it across the room when this happened:

It simply repelled the paint after about 30 seconds

I must have been tired that night, because I didn't sand that frame down first.  I dove into my stash of sandpaper and sanded away only the part that I was going to paint.


These took 4 coats of paint to get the paint opaque enough so the white base would not show up under the brush strokes.  

first coat


third coat

I didn't take a photo of the final coat before framing the prints, so I'll just have to work on the description of pulling the tape off without peeling the paint off with it.

Put your flat edge (in my case, it was a ruler with a thin metal edge) against the seam where the paint and tape meet on the inside lip of the frame.  Slowly pull the tape off of JUST that side, move the metal edge to the top part of the frame, hold it down, then slowly peel the tape.  Repeat with the bottom side of the frame.  You should have a mostly clean edge.  I had tiny imperfections where the tape pulled away unevenly, but unless you're really looking for it, it isn't noticeable now that the prints are hung.


Here's a cost breakdown:
  • Ikea Ribba frames:  $1.99 each
  • Craft Paint:  about $2.00 each
  • Painter's Tape:  Already had some, but paid about $6.00 at Home Depot
  • Sandpaper:  Already had some, but paid about $2.00 at Home Depot
For around $20, you can whip up some pretty frames for your photos and artwork.

I think Em would be proud!

Monday, March 25, 2013

Reveal: THE BEDROOM!

It has been a crazy amount of work, but the bedroom is finally done (well, except for the window treatment).  Before we get to the details of the "new" bedroom, let's go back and remember the hideousness that was the "old" bedroom.  Just a note that when I took these pics, the room was a mess because I was prepping walls and moving things out so we could rip out the carpet, which looked like this:

That's genuine 1980s mauve

Paint swatches and all.  Ugh.

View of the closet, pink walls,
tiny bookcase, tv, and gratuitous paint swatches
It was so pink in there


Of course, I have to include a photo of the china cabinet, since it hasn't had a proper debut since it was painted:

Doesn't it look so sad?

Since we're walking down memory lane, here's the night table that was distressed for the Winter Pinterest Challenge:


Out with the old, and in with the NEW!!!  This is the view when you first come through the door:


Pinterest Challenge night table


Lily supervised the photo shoot


Closet detail and laundry basket
Why yes, there is a sparkly gold chevron print in the closet.
 Tiny birds are everywhere...
this one is on the TV
... and in the china sweater cabinet
New home for the TV
designer-inspired frames
It is so odd to have a window in the closet.
an unexpected pretty hinge
Had to have this pillow
The ceiling color surprised us by appearing to be a grayish white against the dark paint
The ceiling paint looks closer to the actual color
in this picture
The floors need to be refinished, but still a vast improvement from the carpet

I'm sure you want details, and I'm only too happy to provide them:

  • Wall Paint:  Glidden Dark French Chocolate (flat)
  • Ceiling Paint: Glidden Amethyst Haze (flat)
  • China Cabinet & Night Stand Paint:  Behr Belgian Cream (flat)
  • Small night table:  Ikea Lack table
  • Quilt:  TJMaxx
  • Basket:  TJ Maxx
  • Pug Art Print:  TJ Maxx
  • Small White Frames:  Ikea Ribba
  • Bird Prints:  Ikea Kort
  • Bonjour Bear Print:  Sebastien Millon
  • Table Lamp & Rectangular Shade:  Target Threshold 
  • Gold Glitter Paint:  Martha Stewart at Home Depot
  • Chevron Stencil*:  Cutting Edge Stencils
  • Tiny White Birds*: Amazon.com 
  • Gold Glittery Bird:  Michael's
  • Burlap Paris 1868 Pillow:  Ebay shop FrenchPresents
  • Gold Beaded Pillow:  Crate & Barrel (sold out)
  • Cream Fuzzy Pillow:  Walmart
*contains affiliates

As far as the "how-to" bits go, I'll provide those details in upcoming posts.

Tuesday, March 19, 2013

So Far, So Good.

Here is a list of what I've accomplished in the bedroom over the past two weeks:
  • Bedroom walls and ceiling are painted
  • Horrid mauve carpet has been ripped out
  • The china cabinet has been painted and moved into the bedroom
  • The glass knobs for the night stand have arrived and been installed
  • The night stand has been moved into the bedroom
  • The stencil for the closet arrived
  • Some art for the room has arrived
What I still need to do:
  • Buy frames for the remaining art 19 March
  • Purchase spray paint 19 March (but went with metallic acrylic craft paint instead)
  • Paint frames
  • Get tiny washers and nuts for the night stand's knobs
  • Finish stenciling the closet
  • Hang art
  • Organize closet, shoes, etc.
  • Organize bookcase
  • Decide on window treatments, buy them, and install
So, that is where I stand right now on the bedroom project.  Here is a teaser of the finished project:

Obviously sooo not finished!


Sunday, March 10, 2013

Pittsburgh Trip

Late last night we got back from our shopping trip to Pittsburgh.  It is a bit of a hike for us, so we spent the night at the Hyatt Place-Pittsburgh Airport.  We were quite happy that they upgraded us to a cafe suite, so we had a nice living room area to hang out in.  The girls, however, had other ideas:


The girls breaking in the beds at the Hyatt

My eldest daughter's best friend moved there last year, so her mom and I conspired to surprise the girls with a sleepover.  I'm happy to say that that went off without a hitch, and our two girls stayed up until 3:30 in the morning catching up and eating a giant cookie. 


They are too flippin' cute.

On the way to Liz's best friend's house, we passed a candy shop called Andy's Candy in Burgettstown.  It is the sort of old-fashioned, handmade chocolate shop that is a rare sight now... so of course, we stopped.  


I couldn't stop laughing at these bunnies!

With the egg-hiding rabbit holiday upon us, there were loads of springy sort of chocolates... bunnies, eggs, chicks, flowers.  I was gobsmacked, though, when Evie, the middle kidlet, picked up this:


BACON!

Hold the phone.  Chocolate.  Covered.  Bacon.  And not just teeny tiny bits of bacon swimming in chocolate, either.  This glorious creation is bacon strips enrobed in the creamiest milk chocolate around.  

I bought 3 packages of it.  Before you scream glutton, only one package is mine.  My BFF, Lola, gets one, as goes my other partner in crime, Corey.  Everything goes better with bacon, and that includes friends.

On our arrival day, we went to HomeGoods to scope out their offerings.  I ended up getting most things for Lily, who needed a new harness, leash, and some dry shampoo.  Since it is nearly time to start foraging in the woods for wild ramps and mushrooms, I got her a dayglo orange harness so that any spring hunters won't mistake her for a turkey.  


I think she's embarrassed
Sadly, the console tables were pretty picked over at the HomeGoods we went to, so I didn't get one.  I was excited to find the Cynthia Rowley quatrefoil towels that I had picked up at a HomeGoods in Florida, so I got a few more of those.  I didn't find a jewelry box that fit my standards, but I did find a necklace tree to keep them in check for now.


On day two, we went to Ikea.  I forgot the camera in the hotel, so the pics I did take ended up on my Instagram feed.  Fair warning, it's mostly cake-related.

Ikea was PACKED with people since they were running a new event (Bring Your Friend) and the kids even had to wait 20 minutes before they could get into Smaland (the little kid playground inside).  I was armed with my list, most of which was to replace the Ikea 365+ dishes that have broken or chipped, bigger bowls for pasta, some food storage bits, another roll of paper for the easel, and some bits for the front porch remodel.


food storage bits
I generally cook a few times a month, in huge portions so that they can be divided and stored in the freezer.  Dinner in our house is a simple affair:  I just pull something out of the freezer the night before and either finish cooking it, or heat it up.  These food storage containers make that job a lot easier.  The red-rimmed 365+ container has a little vent at the top to make reheating in the microwave that much easier.  It seals like no one's business, and freezes without any freezer burn issues.  It is also under 5 bucks.  It comes in a few different sizes, but the one I rely on is the 10x7x4-inch badboy.  They easily store a main dish for 4 people.  There are larger and smaller sizes, so you can easily find one to fit your needs.

The bowls are the Reda food containers (they have all sizes), and they are the nesting set of 5 different sizes.  These are about $4 at the store, even though the website states that they are $2.99.  I use them to store leftovers, extra egg whites, and veggies that I've pre-cut for dinner.  

I stocked up on some must-haves:  Ribba frames, Bevara bag clips, and Kassett magazine files.  

My most favorite thing I picked up was a set of Dinera bowls for pasta.  They didn't have 8 in the beige that we originally wanted, so we settled for the green, which has grown on me.  I am really happy that I got them.


They're already washed and in the cabinet.
The other 365+ bowls and plates are on the 2nd shelf next to the owl mug (West Elm).  We wanted to have a set of 8 so that we could entertain comfortably, since there are 5 of us, and six of everything just isn't enough.  In case you're wondering, the hobnail-looking mugs are from Target.

Today, I've been getting the raised garden beds put together and prepping to get that all set up before Wednesday.  More to come on that note.  I hope it is just lovely where you are!

Thursday, March 7, 2013

The Weekend List

If all seems quiet on the Pennsylvanian front, I'll have you know that we've been busy little beavers groundhogs.  I feel like Home Depot is my second home, since I've been there so often in the past few weeks.  I don't know whether to be proud or sad that the people at the paint counter now recognize me, but I'll err on the side of proud.  

We decided to take a break from our busy bedroom-remodeling schedule to go to Pittsburgh this weekend.  The walls are painted and the ceiling is slated to be painted before Friday.  I've ordered some details for the room, but it is still missing quite a lot by way of finishing.  For that, we need some serious shopping options.  I do not live in an area of the state that has any serious shopping options (I've scoured our ONE TJMaxx too many times, and know their inventory by heart... and it is a 1-hour drive each way).  Time to bring out the big guns and get to HomeGoods, Ikea, and Pier 1.  Basically, if it has a home section, we're going to it.

On the purchase wish list (whole house):

  • curtains (because we haven't perfected "total darkness" yet).
  • pillows
  • mattress pad with 21-inch pockets
  • frames
  • art of some sort, maybe
  • some sort of organizer for the girls' art supplies
  • twin-sized sheets (hello Target 400 thread count!)
  • lingonberries (hey, it's Ikea... we need them).
  • Dignitet curtain wire 
  • magazine holders/organizers
  • a bench for the entry
  • a console table for the entry
There's the list.  It seems rather haphazard, I know, but it is the sort of odds-and-ends kind of list that gets created when you live in the boondocks and can't find certain things.  

Tonight, I also picked up something extra special to use in the bedroom decor project.  I'm really quite excited about it, especially since it got the seal of approval from my BFF, Lola.  I was completely on the fence, and when one is on a fence, one should have someone like-minded to push you off of the fence, and onto the side you really wanted to go to, but didn't think you were bold enough.  Of course, I can't reveal anything about it until the big reveal, but let's just say that I'm jumping around my house just thinking about it!

Okay, here's a hint:

Pow!
Is it metal?  Shiny things?  Gold?  Silver?  I want to tell you, really, I do.  But that'd just spoil the surprise.  There is nothing worse than a spoiled surprise, except for your ice cream landing on the sidewalk.  *sad face*

Random puppy shot:

Lily makes everything better!

I've been going nonstop since last Thursday night (filling holes, sanding, washing walls, taping, painting, etc).  Not to mention kids, general cleaning, reading, shopping, and planning our weekend lists.

After work and playing chauffeur to the eldest kidlet, I will be taping off the walls and prepping the ceiling for paint.  I'll also be doing quite a lot of measuring and prepping in the closet.  We're planning on tearing out the pink carpet on Sunday, so it is going to be a busy, busy sort of weekend.  Rumor has it that we are supposed to get some lovely spring weather... we might even see 60 degrees!  Here's to hoping we can turn the heat off soon!

Monday, March 4, 2013

Just Call Me Tex...ture

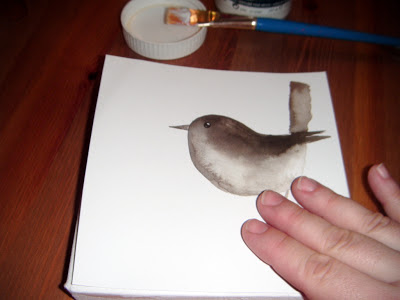
I bought a teeny watercolor painting on Etsy.  I think my mother's love of birds is starting to rub off on me, because right now, I'm totally into all things birdie. The print arrived, and I thought about framing it.  With the new wall color (I promise, the bedroom is nearly done), I am not precisely sure what sort of metal color I want to go with, so framing right now, isn't an option.  This bird print really needed some texture.

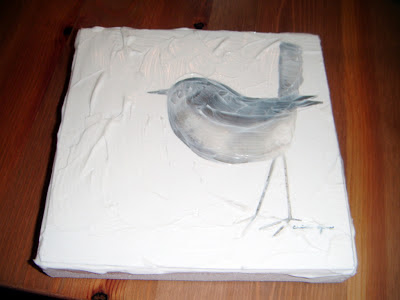
I had the idea to mount the print onto a canvas, and add some texture with some acrylic gel medium.  The resulting image changes the look of the art medium from watercolor to acrylic, complete with brush strokes!  The best part is that I don't have to drop some money on a frame unless I really want to.

texturing & mounting supplies

What you'll need:
  • brushes- a wide one and a tiny one
  • a canvas the same size as your print, I used this one by Windsor Newton
  • acrylic gel medium (I used matte, it also comes in gloss), I used Liquitex matte
  • scissors, for trimming if necessary
  • your print

The first thing you'll need to do is trim your print to fit the frame.  If the print has the same color background as the canvas, being exact isn't completely necessary.  If, on the other hand, the print is dark, you may want to either paint the canvas to match the background color or use the canvas as a guide to cut the print to fit.  You can also self-mat the print by using a larger canvas than needed, just be sure to use a level and a ruler to make sure that the spaces are level and as equal as you want them to be.


After my not-so-exact trimming job
Once my print was trimmed, I set it aside and went about covering the canvas in gel medium.  This layer should be thin and even.  I used full-strength gel medium (it can be diluted with water up to 25%), because I didn't want the additional water warping the paper.

The thin and even bottom coat
Then, I placed the print on top of the canvas, making sure the print was straight.  I used my hand to apply gentle pressure to the print, from the bottom corner upward, so that there wouldn't be any air bubbles under it.  


No bubbles!

It is perfectly fine to have gel squooshing out the edges,
just as long as the print sticks.
The great thing about gel medium is that you don't have to wait for the gel to dry before moving onto the next step, which is making sure the edges won't lift.  To do this, I put a thick coating of gel along the sides of the print.

It'll dry clear and the edges will be less noticeable.
Next, gel medium needs to be generously applied to the whole print.

I put on a big glob of gel, then spread it around

Keep in mind that your brush strokes will dry as they are.  If you want to have softer brushstrokes, you can dilute the gel with about 15% water.  You might want to test it on a piece of the print that you trimmed off (if you did) to see if the paper will warp.  If it does warp, reduce the amount of water in the gel until you get a result that doesn't warp the paper.


Completely covered

Next, if you want finely-detailed brush strokes, take out your tiny brush and go to town.  I used my tiny brush to "paint" feathers onto my bird, and to create texture that highlights the legs and tail.  I also swiped it around the outline of the bird's head, back, and belly.

Don't forget that this will dry clear,
and the texture will simply highlight the print

Once I completed texturing, my bird looked like this:


Put your canvas in a safe place to dry.  In my house, this is the top of the chest freezer, where little kidlets cannot get to it.  

Once it is dry, pop some hanging hardware on the back, or frame it if you want, and hang it up!

This is what birdie looked like after it dried:

On my office wall, from about 6 feet (2m) away
You can see bits of texture from a few feet away, but as you get closer, the texture is more evident.

Just in front of birdie

From the side.


Extreme close up. 


I am definitely putting this sweet little bird in my bedroom, but I'm not quite finished working on that room.  Where would you hang such a tiny piece of art?  Would you leave it on a wall by itself for the biggest impact, or would you display it in a group?  Do tell!